The application wizard allows event organisers to prepare official permit applications and submit them to the relevant authorities. By entering all parameters of the planned event data into a simplified four-step process, the tool automatically determines
- which permits are required,
- to which authorities they need to be sent,
- and which documents are needed for each application.
Some application forms can be generated in the tool in a standardised format that meets the associated legal and administrative requirements and allows all associated attachments to be uploaded. These prefabricated applications can then be downloaded in PDF format and submitted by email to the relevant local authorities.
The basic principle of the tool is that your input is application-neutral. This means that all relevant parameters of the planned event are first collected and then checked to see which permits are likely to be necessary. The tool then shows which forms need to be filled out, where they need to be sent and which additional materials, information or documents are required. Subsequently, many of these documents can also be generated automatically.
To begin the process, click the "Application" button on the header bar.
4-step input
There are four steps to entering the parameters for the event:
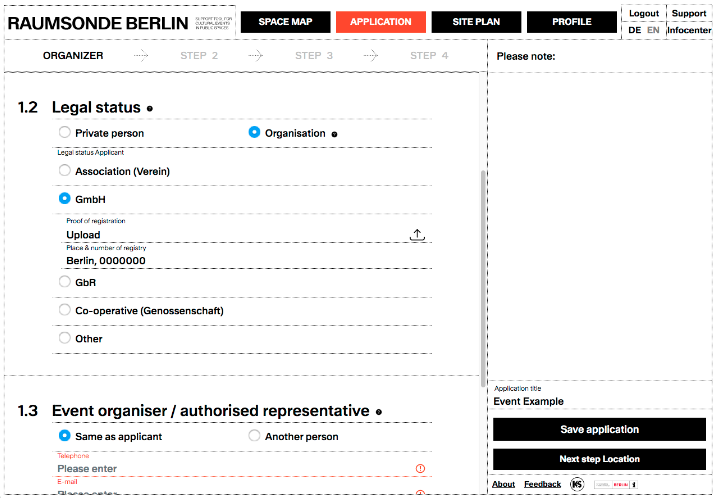
Step 1 - Applicant
In step 1, information about the applicant is requested.
You need to know the details of the person or organisation making the application, including company details if it is an organisation. If the event is coordinated by a person other than the applicant who is to act as the contact person for the authorities, this can also be indicated separately. Organiser's liability insurance is usually required for public events. If your event takes place in a public area, your insurance company must fill out a separate form that can be created with the tool. This can be submitted with your application or later, but is required for final approval.
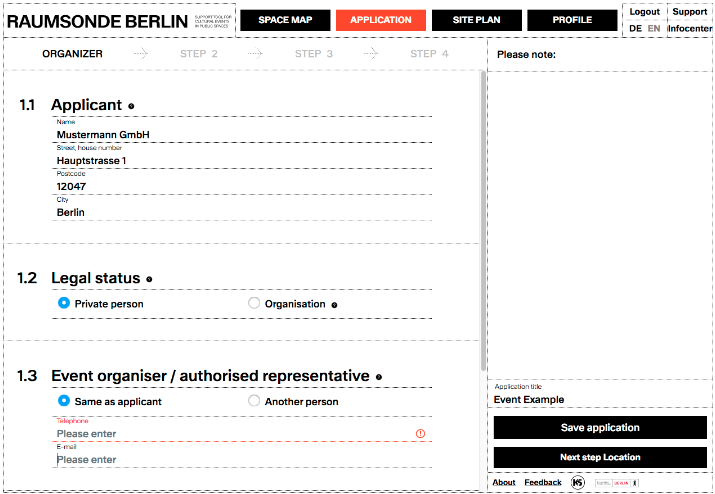
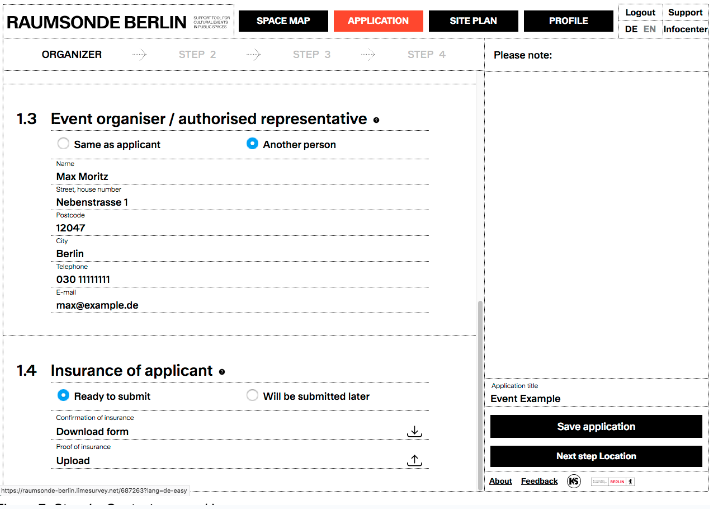
Once you have completed the fields, you can click "Proceed to Step 2".
Step 2 - Location
In step two you need to enter the parameters for the event location.
Enter the exact address and type of space where the event is to be held. You can use the SPACE MAP or the QUICK CHECKER TOOL to find out what type of space it is. As an event may cover more than one type of space, you can make multiple entries for the space type if required. This could mean that multiple permits are required for the different types of space. The tool will assist you with this.
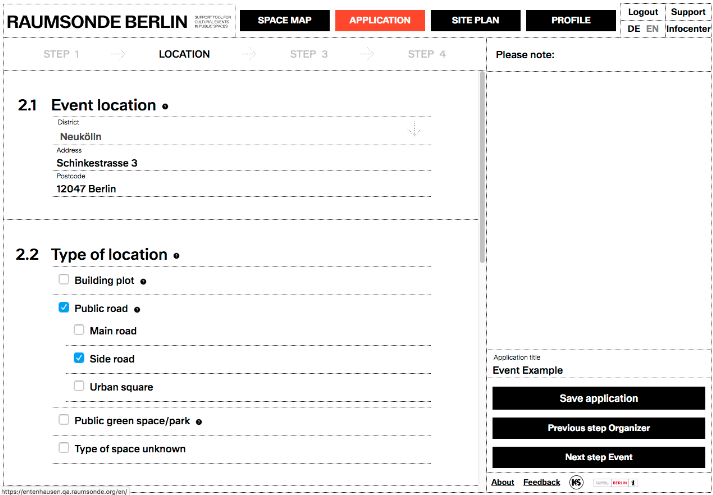
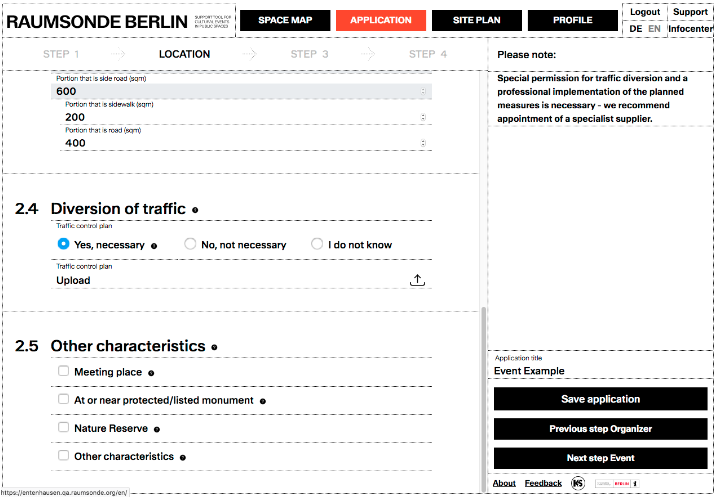
You also need to know the space your event requires. If you draw a site plan at the same time as filling in this information, you can use the site plan tool to measure exactly how large the different rooms and areas required for your event are. The administration needs to know the areas of the different types of rooms and also, for example, the separate areas of road and pavement, as these factors are crucial for calculating the required fees for the use of public space.
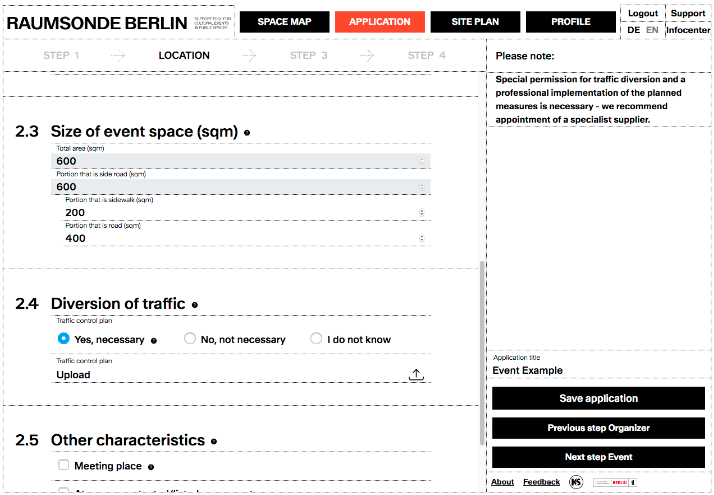
If you are planning an event on a road, traffic may have to be diverted or restricted for the duration of the event. A street may have to be completely closed for this purpose. Parking spaces may have to be temporarily cleared and kept free or - depending on the situation on site - even bus routes may have to be diverted. This requires a separate permit, the so-called traffic order, for which a special plan must be drawn up and many specific regulations must be observed during its implementation, such as the use of certain signs, the fencing or cordoning off of areas, the maintenance of necessary access for the fire brigade or garages and the like. While it is possible to hire the necessary equipment and organise this on your own, the process can be complex and requires expertise and coordination. We therefore recommend that organisers hire a professional organisation to take over this task, including the necessary planning. They will prepare a traffic diversion plan, 5 copies of which must be attached to the relevant application.
When you have filled in the fields, you can click on "Continue to step 3".
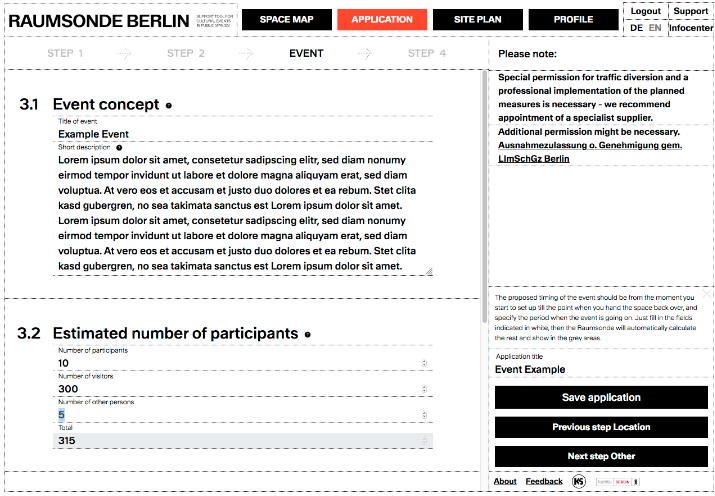
Step 3 - Event
In step three, all important information about the event itself is requested.
First, you need to give your event a name and describe it briefly and to the point. In your description, you do not need to repeat any aspects of the event that are asked for in the other input fields, but provide all other relevant information, such as:
- What kind of event it is
- Who are the target audience
- What the public interest is that the event addresses (That is particularly important for events in public spaces)
- What value your event has for the local community (This can help as a justification for the permit)
- If your event is part of a larger framework of cultural activities
- What consideration has been given to the environmental impact of the event
- If the event will impact the local microeconomy
- If the event is part of local tradition, that has a history
- If the event is part of a specific, important outreach programme, local initiative or similar
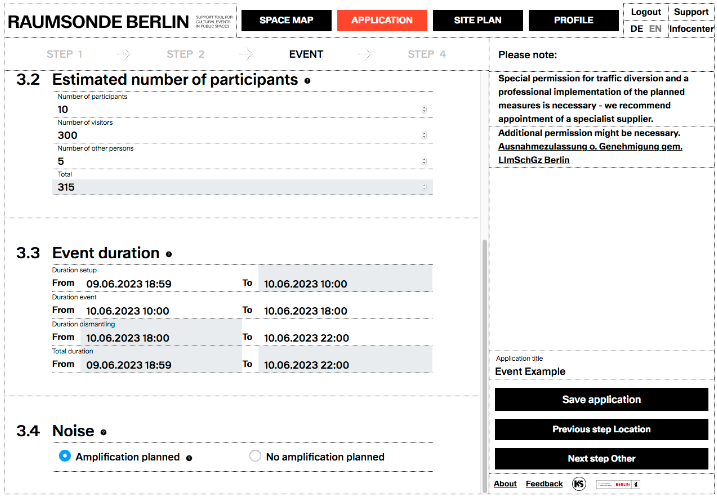
Next, you should give an estimate of how many people are planned for the event. With these estimated numbers, you can differentiate between participants, visitors and other people (such as staff, artists and security personnel) if necessary. In principle, however, it is mainly the visitors (guests) who need to be indicated.
Next, you should specify when the event is to take place. You need to plan for the entire time you will need the space or location, from the time you start setting up to the time you leave it in the condition you found it. You should also indicate the period of time during which your event will actually take place. Here, too, you only have to enter a few key data and times, the tool calculates the rest and displays everything in the grey field.
An important final point is whether you are planning to have an amplified sound system (e.g. a larger music system for a stage or similar) for your event. - If so, it is usually necessary to obtain an exemption from the usual noise limits that have to be respected in a certain neighbourhood. This depends on how loud your event will be, at what time and for how long you want to hold it, and also on the proximity of potentially adjacent residential areas. This exemption is a different process than the permit for your event and must be submitted to a different department. At the end of the application process, you will receive a link to this permit service or to the competent authority via the application assistant.
When you have filled in the fields, you can click on "Continue to step 4".
Step 4 - Other Information
In step 4, all other relevant information for your event is requested.
Firstly, any built installations or structures associated with the event should be described here. They may come under the category of “Fliegender Bauten” (Flying Structures), with type approval given by the TÜV and a Prüfbuch.
Some “Fliegender Bauten”, such as tents with an area of up to 75 sqm, do not require any additional approval, while larger structures may require approval from the local building supervisory authority in accordance with §76 BauOBln. You can find more information on this in our Infocenter.
Custom-made or hand-built structures usually do not have such a building permit. While smaller elements do not require a special permit, large structures may require a special permit.In case of doubt, you should contact the local building inspectorate as early as possible, as such procedures are usually very lengthy and require careful coordination.
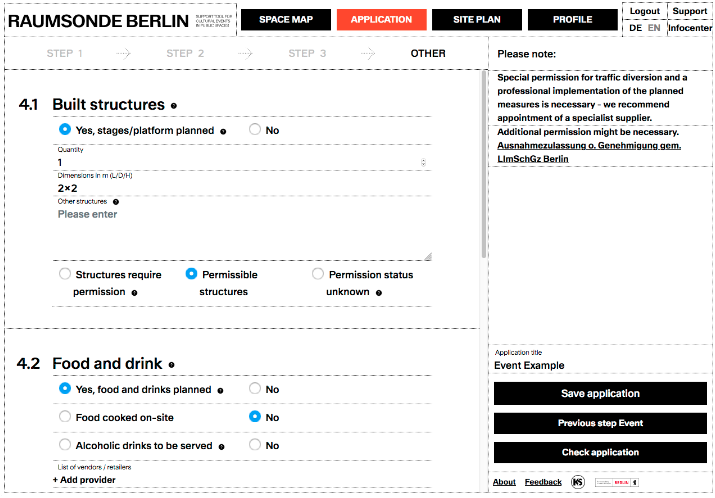
The second aspect covered in this section regards any food and drink that may be available at your event. Here again, depending on the scope and manner of what you have planned, this information should be as precise as possible. Anything which is not directly asked for under this section, but which may be relevant, can be included in your Event concept text under 3.1 above.
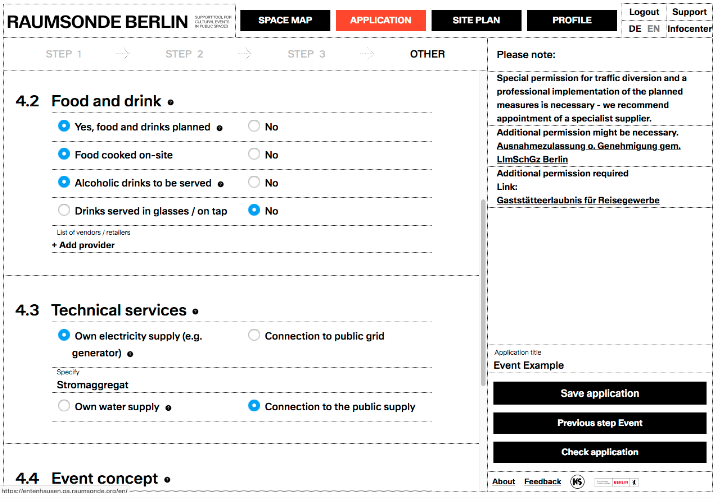
The third area in this section concerns the technical supply of the event, especially electricity and water. If you intend to connect to the public grid (e.g. to the electricity grid via a site power connection or to the water supply and waste water disposal) or if you provide your own infrastructure (e.g. generators, water tanks, self-sufficient toilet facilities, etc.), you can describe this here. Also, make sure that everything you plan is marked and labelled on the site plan you submit with your application.
Finally, in the fourth section you can describe any further aspects of your event not previously covered. Some of these - for example fireworks or pyrotechnics - may require additional permissions, for which the tool may be able to assist.
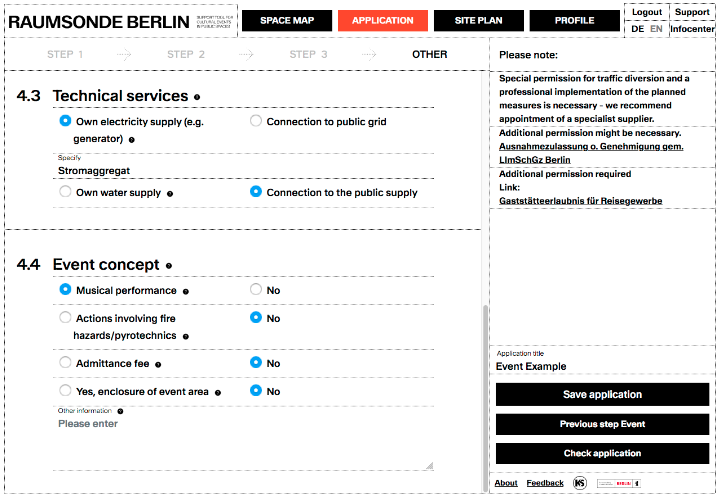
Once you have filled in the fields, you can click on the "Review Application" button to run the pre-audit process.
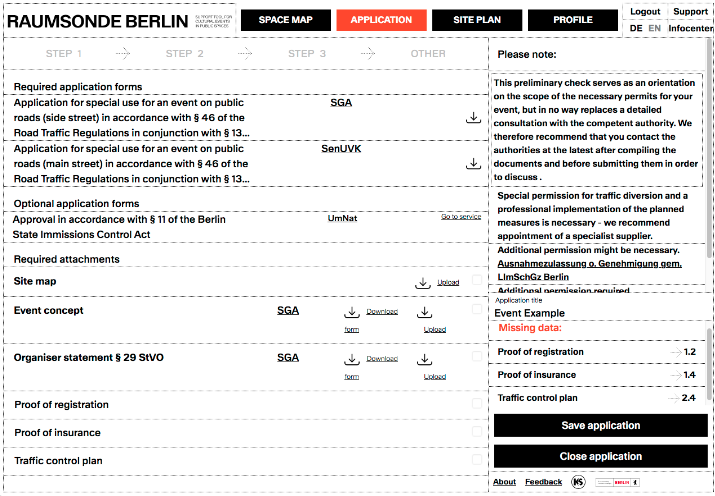
Pre-submission Audit
When the 4-Step input process has been completed, you click on the “Review Application” button at the bottom of the page. The tool performs a preliminary check to advise the applicant which permissions will be necessary for the planned event in the desired location. Should any details in the previous inputs be missing or insufficient, the associated fields are listed in the Information Column before going onto the Checking step.
A preliminary list of all necessary applications and related supplementary materials is generated. Depending on which approvals are required, some of the application forms and related documents can be generated by the tool itself. For other applications, especially those for which specific other online application tools already exist and are already mandatory for certain services, links to the relevant websites are provided. Here you will also be referred to the various offices in the authorities to which the respective application must be sent.
Due to the wide range of applications received by the administration, as well as the multitude of different location-related factors that can play a role in a permit, the administration has a great deal of leeway in deciding what information is required for a particular event and in what detail. The tool's recommendations can therefore only ever be rough guidelines to give you a feel for what is involved, who you need to speak to and how complex the matter can become. We recommend that you contact the relevant district authority prior to submission to check the scope of applications and associated materials in order to save time and speed up the approval process overall.
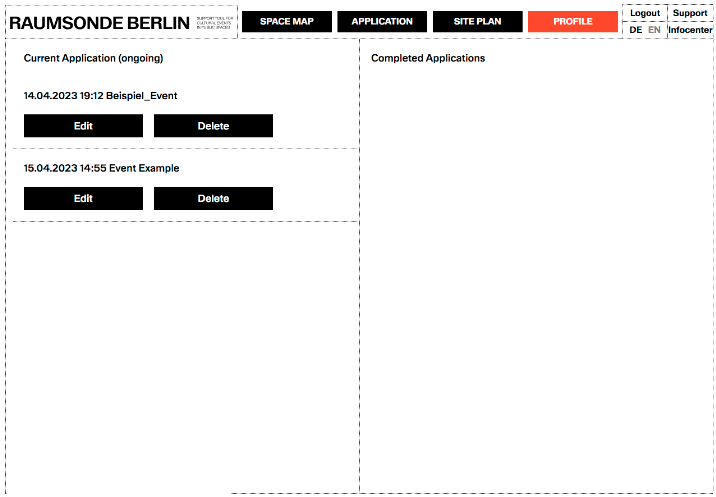
Save Application
If you are logged in with your user account, you can save the entire application input from the four-step procedure at any time. It is saved in your user area and can be changed, added to and saved again at any time. You can also save different versions under different names so that the entries can be adjusted as you refine your planning or as circumstances change during the preparation of the submission. In this way, you can assess at the beginning of your planning what this may mean for the administrative process in terms of the location, size and content of your event. Submissions can then be progressively adjusted based on discussions within your team, with associated partners and stakeholders, and on preliminary discussions with authorities.
This way you have a better basis to get things right before submitting permissions and the facility to manage changes in your plans as the organisation becomes more detailed.
In the user profile, old applications you have made are also stored, so that you can use them again for repeating events, adjusting the parameters as necessary. This saves time in preparation of applications, and, by referring to previously successful applications, helps improve the quality of your submissions.
Exporting and submitting applications
From the Audit area, you can see the indicative list regarding which permissions your event will probably involve, and which administration is responsible for each of them. For certain permissions, digital application procedures are already available. There are links in the Vorprüfungsfenster to URLs for these services. At the moment, the RAUMSONDE does not have the capability to transfer your inputted information directly into these external services, but we hope in the future to develop this capability to allow complete management of the permission process through the RAUMSONDE interface.
For application procedures which such standardised digital services are not currently available, such as for Sondernutzung, waivers for events on protected green space, or for the use of certain pyrotechnics, application forms can be generated from your inputs through the RAUMSONDE which can then be saved locally as PDF documents, to be submitted either via email or on paper after printing out.
In addition to the forms for the individual application, some of the required documents can be generated directly from the RAUMSONDE and using the parameters already entered.